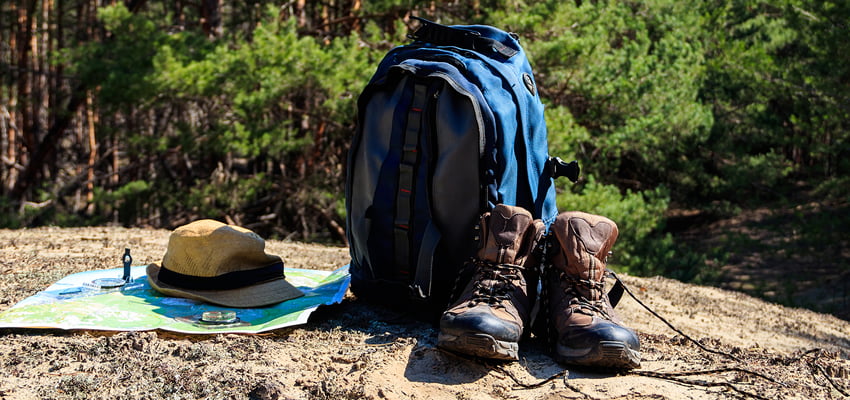
A bugout bag is the most crucial collection of survival gear that you may never need to rely on. A packed bugout bag at the ready means you are prepared for a catastrophe or event that’s so disruptive that you need to leave your home and survive on your own for up to 72 hours. Natural disasters like earthquakes, floods, and forest fires are all regular events that could easily disrupt local infrastructure and force you to flee with little notice.
So, what goes in your bugout bag? Your bugout bag must contain essentials to survive on your own for roughly 72 hours, on foot. The items you choose to bring should be placed under extreme scrutiny. They need to be lightweight and purposeful. Only the absolute essentials required to survive a 72-hour window in your nearest rural area should be considered.
Considerations
Before I get down to the nitty-gritty, I want to share a few tips on how to build your bugout bag.
- Don’t weigh yourself down. Keep your bugout bag as light as possible.
- Ignore gadgetry, especially items that can only perform a single task, unless that task is essential to supporting your life.
- Don’t spend money you don’t need to. Many items on this list can be collected second-hand or can be purchased on the cheap. (There are a couple of exceptions; read on to find out more)
- Reuse, if possible. If you have a hobby that overlaps survival, like camping or climbing, keep items you might use, like an ultralight tent, in your bugout bag when not using it.
- Consider that fleeing to a preplanned camp might not happen. In case of a natural disaster, taking refuge in a disaster shelter set up by local authorities might make more sense, in which case, you still should pack for it.
Building a Bugout Bag on a Budget
A bugout bag doesn’t have to be equipped with new items. In many cases, some of the best survival equipment can be found used at local military surplus stores, on craigslist, or at equipment co-op exchanges. Local Facebook groups often organize equipment swaps.
The Bag
I’m not going into detail here, but your bag should be durable, lightweight, and a two-strap backpack style. Spending a little extra money on a bugout bag is fine. If your bag is uncomfortable or fails, it will undoubtedly slow you down.
If you have a bag that you already have that you can trust while building out the rest of your bugout bag, go that route. It’s better to use your old college backpack with a full stock now than a $200 bag that doesn’t have the right tools.
A Good Knife

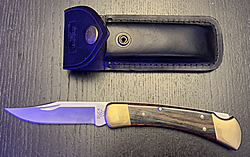
This should be the first thing to include in your bag because a knife is the tool that will help you manipulate your environment more than any other tool. Don’t spend money on a large survival knife when a cheaper one will serve you in many ways. A good quality survival knife is an excellent thing to have, but how much will you actually use if it’s designated for your bugout bag? Choose wisely.
The Buck 110 isn’t too big, but it’s not a toy. This knife has been around forever, and I’ll tell you why. It’s a classically styled knife that has a proven design. It’s sturdy, a perfect weight that fits in your hand really well, and it’s not a very expensive knife.
A Decent Hatchet

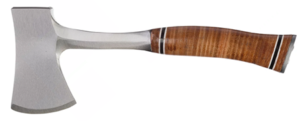
Why not a saw? Actually, an argument could be made for either, but for the purposes of this list, I will argue for packing a hatchet because that’s my preference.
Saws are more efficient but don’t process firewood quite as well. They’re quicker to fell trees but don’t split wood at all. Saws are lighter but nowhere as durable or as versatile as a hatchet.
I’m a big fan of Estwing axes because they are great for their price. The Estwing E12A is small, cheap, one-piece, and very sharp. It isn’t my day-to-day, but it’s incredibly reliable and perfect for a bugout bag.
Water

While some prefer to carry at least three quarts of water, I find that if you take a quart with you and get the rest on your journey, you will save yourself four pounds for other equipment. Of course, thoroughly consider your immediate environment and read up on water and survival.
A military surplus canteen and cup is the way to go here. They pack together, and the steel cup can heat water or food over a fire or stove. Go for an actual USDI or other official NATO canteen and cup with a butterfly handle. They’re rock-solid, they’re cheap, and they are very versatile. If you don’t have a military surplus shop near you, try Sportsman’s Guide for the cup and canteen.
And a Way to Make Drinking Water
If you can’t carry bunches of water, can’t boil any, and don’t know when you can find safe drinking water, you need a backup plan. There are a few different ways to get safe drinking water, but only two fit in your bugout bag, and I recommend using both.
Filtration – a reliable filtration system is the best way to make drinkable water on the go. Still, these small filtration systems can take time.
Chemical Treatment – Blasting harmful bacteria out of your water is imperative. However, these additives don’t do anything to remove large particles and organic compounds from water.
Using a combination is your best bet. First, use a filter to take out any contaminants. The Katadyn BeFree does an excellent job at filtering water directly from a source. It weighs less than 2 ounces, and the bottle portion collapses down. It filters out most microorganisms.
Next, a chemical treatment will ensure that any leftover microorganisms are sufficiently fried. I like to use iodine tablets with taste neutralizers over chlorine tablets because they work in about 30 minutes versus up to 4 hours with chlorine tablets.
Of course, carefully choosing your water sources is still very important, regardless of how well your water is treated.
A Good Tarp

And by good, I mean a waterproof tarp with lots of tie-downs. Then, learn how to turn it into a shelter because a tarp will do you absolutely no good if you don’t have that skill. Look for something at least 8’ x 10’.
A great tarp that will make a great shelter and stay waterproof is the Aqua Quest Guide. It’s light and durable.
A cheap alternative is the big blue tarp everyone is familiar with. They’re inexpensive and take quite a bit of abuse. I suggest avoiding 3rd party sellers hawking cheap imports on marketplace sites as they can be too unreliable. Places like local hardware stores or Walmart are safer bets.
A Sleep System
This one can be difficult to wrap your head around because most people automatically think a sleeping bag is the only way to go. Sleeping bags are either expensive or bulky. A sleeping bag that is compressed and stored long-term is more likely to lose its ability to retain heat because the filler won’t bounce back.
Please note that the following recommendations come from someone who lives in a cool climate, not a cold one, and definitely not a tropical one. The sleep system you pack in your bugout bag should reflect your local environment.
An emergency bivvy combined with a wool blanket will be both lightweight and inexpensive. I like wool blankets because they’re angular and a bit more versatile. To use, place the blanket inside the bivvy for extra warmth.

The standard emergency bivvy recommendation is this one from SOL It’s not going to last years, or even weeks of use, but it will get you through a few nights. If you’re unsure it’ll last 72 hours, pack two.
I like getting military surplus wool blankets from Sportsman’s Guide. A fleece blanket is also an option if wool does not agree with you.
Some Food
Do not forget to pack and rotate your food as necessary. Food is sanity in a survival situation.
An economical way to stock your bag is to buy or make trail mix, split it into 400-500 calorie servings, and vacuum pack it. Jerky can be cheap if you know how to make it yourself. Dehydrating fruit in season is also economical. You don’t need fancy equipment if you have a working range in your home.
Freeze-dried food is by far the lightest to carry. It can also be very nutritionally dense while remaining healthy. The downside is that you will need to drink a little extra water to compensate for the lack of moisture you would typically get from your food. Backpacker meals are great as long as you can boil water.
Don’t pack cans or boxes. Even air-packed foods are a waste of space. Aim to pack three or four days’ worth of nutritionally dense foods in your bugout bag. Stick with proteins and healthy fats and avoid sugars and heavy carbs—no candy, boys and girls.
An Emergency Medical Kit
You can buy an emergency medical kit, but they aren’t as well-equipped as we likely need them to be in an actual emergency situation.
Make your own emergency medical kit by packing the following:
- a sling
- compression bandages
- tourniquets
- topical anesthetics
- antiseptic and antibacterial wipes
- stitching needles and thread
- medical tape
- adhesive bandages
- anti-inflammatories like ibuprofen and acetaminophen
- a supply of any medications you need to survive.
Extra Clothing
Pack for your climate, but pack light. I live in a 4-season area. In early spring, I switch out my winter clothing bag with a summer clothing bag, and vice-versa in the fall. Keep extra socks – to the tune of two or three pairs extra. Wind-resistant nylon pullovers are not a burden.
Good Footwear
Keep a pair of hiking boots or solid shoes at or near your bugout bag. Break them in and make sure you’re comfortable wearing them for 10 hours at a time because you’ll be wearing them longer.
Ziploc and Garbage Bags
Pack everything you can in appropriately-sized Ziploc bags, and then pack extras. They’re great for keeping things organized, compressed, and dry within your pack. Carrying extra bags is just as important. Accidental spills in your pack can ruin your stuff without you even knowing. Packing a pair of wet socks in an extra bag ensures moisture won’t spread throughout your gear.
Extra garbage bags are great for packing up your camp in a hurry when a surprise storm strikes.
Phone Cord & Charger
This one is pretty self-explanatory. A small solar charger may make an adequate power supply, but it’s not something I’ve looked into. Avoid rechargeable backup batteries as they are wholly unreliable when storing power long-term.
More Than One Way to Start a Fire

A cigarette lighter is an obvious choice. As a former heavy-duty smoker, I recommend Bic lighters. They’re cheap and incredibly reliable. Adjustable lighters have benefits, like throwing 6-inch flames, but they burn through their fuel quickly.
Pack something like a BlastMatch. A BlastMatch is a Ferro rod in an encasement, designed for use with one hand. Ferro rods are remarkable metal rods comprised of different metals that spark when scraped with a hard object. They can get wet and still work after the surface is wiped dry. It’s invaluable as its sparks are hot enough to light a lot of natural tinder, such as dried grasses, barks, and shavings from sticks.
Weatherproof matches are a decent choice, but they won’t work well when your striking surfaces are wet. A BlastMatch will create a hot enough spark to light them, however.
A Multitool
Don’t be tempted to replace your primary knife with a Swiss Army Knife. If you need to pick one or the other, choose the knife. But having more tools and a smaller blade is handy. Invest in a good Swiss Army Knife like the Farmer. If you’re on a budget, an everyday pocketknife like The Camper costs about half the price.
Another good multitool is a Leatherman.
Paracord, Guy Lines, and Carabiners
This is another no-brainer. The question should be, “How much and how many?” and the answer is, “As much and as many as you can.” Together, paracord and carabiners are infinitely versatile in their ability to hang…. Everything.
A Whistle and Mirror
Though I feel no explanation is warranted, here’s one anyway. Shiny things reflect light. Light travels farther than sound, which can draw the attention of much-needed help like a plane or far-off vehicle. A whistle can attract the attention of searchers or separated party members who can follow the noise to your location.
Entertainment
Yes, I said entertainment. Keeping yourself occupied is essential to your emotional and mental health. Pack a couple of light items (that don’t require power) to you from excess boredom.
- A journal and pen
- A novel or magazine
- A deck of cards
- A small hobby such as knitting
Personal Hygiene

Try to keep this to a minimum. A travel bar of soap, some sanitizer, wet wipes. Some toilet paper tablets. Any other hygiene products as needed. A toothbrush and a small tube of toothpaste. A towel is technically not necessary but does come in very handy.
This microfiber camping towel weighs just over an ounce, is very absorbent, and dries fast.
Odds & Ends – Self-Explanatory Stuff
- LED Flashlight (with batteries stored separately)
- Eating Utensils
Your On-Person Pack
There are items that you should keep with your bugout bag until it’s time for you to bug out, such as passports, documents, cash, and cards. Those items become even more critical and should be moved even closer to your person than your bag. Keeping your personal information and records concealed will protect them (and your identity) from accidental loss or theft.

A neck wallet is my personal preference. The wallet itself is attached to a lanyard that hangs around your neck and is tucked under your shirt. Neck wallets are my favorite because they’re easy to access. They’re relatively cheap, too. Just make sure that it has a layer of netting on the back. This extra layer won’t stick to your skin and cause a rash. This one from Lewis N. Clark is cheap and will work in a pinch.
You can also look for a money belt. Money belts tend to have more space but are more challenging to keep concealed. If you like the idea of wearing your wallet on a belt rather than a lanyard, look for one that lays flat.
Once you have a hidden wallet, what do you put in it?
Your Bugout Plan
I will write about this in more detail, but if you need a bugout bag, you need a well-researched bugout plan. This plan should include destinations, routes, rally points, and potential supply stops. It should also have a list of any phone numbers and addresses that you might need.
Area Maps
Preferably laminated or stored in a Ziploc. Cut out sections of larger maps if that makes sense to you. Study and pack trail maps as well as road maps.
A Compass
Even the best of us get turned around in unfamiliar territory. Compasses are valuable tools for following maps. They become even more practical if you find yourself lost in the woods.
Important Documents
I keep my important documents in my gun safe and carry copies as needed. If you don’t have a fireproof safe at home, consider storing your essential documents in a safe deposit box.
Documents you should have handy:
- Passport
- Driver’s license
- Copy of proof of residency or citizenship (Birth certificates, etc. Don’t carry original.)
- Copies of property deeds, vehicle ownership
- Copies of supporting loan documents, if necessary
- Copies of proof of property, vehicle, medical and life insurance
Emergency Cash
This will be relative to your situation, but cash is king. In our electronic world, a sudden loss of power due to a storm or massive fire makes cashless transactions impossible. Any physical money you can hold in reserve is excellent.
On the flip side, don’t pack too much cash. You may need cash funds for things like gas or food, but there is a point where that stash will become worthless. If an event triggers a banking system failure, it will be unlikely that cash will be king, and tradable goods will become the preferred currency. That extra $50 might better serve you by investing in more Ferro rods.
Conclusion
This list is not meant to be an exhaustive list, but it is a list of essentials to consider putting in your bugout bag that will not weigh you down. Weigh your options when you weigh the importance of everything you pack. Feel free to ignore my advice if you feel that your situation is extensively different from the one. Spend money on items where you think it will be worthwhile.
I’d love to hear from anyone who wants to share their insights.
And above all, plan to be safe.


